
Friday, December 28, 2012
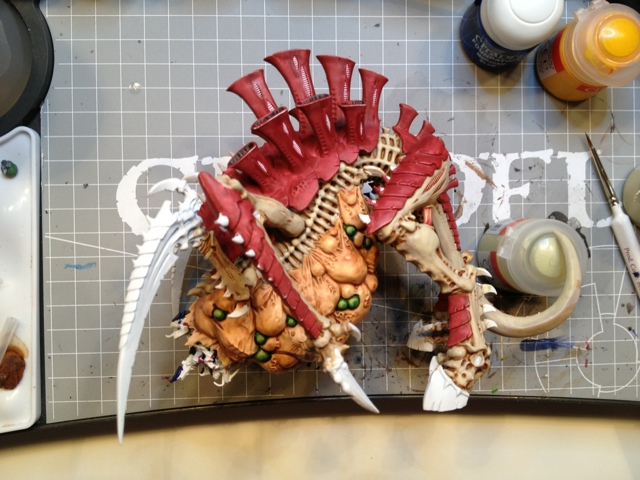
The Great Challenge
I really have to gather some steam for this lot. I just recovered from painting the Librarian in terminator army... wonderful sculpts, and the finecast is actually looking good.
Thursday, December 6, 2012
I hate white
I wish there was some kind of quick secret to learning to paint white, but I have this grim feeling it's just hours and hours of practise. Case in point: my Relic Contemptor, which is getting its basecoats. I'm thinking it will look a lot better with a wash and some more layering.

Sunday, November 4, 2012

Saturday, November 3, 2012

Thursday, October 11, 2012
Watching paint dry
So looking back at my last post, what I have accomplished in two months and a week is the following:
Ultramarines
- 1 x Predator
- Lasplas Razorback turret
- Tactical squad (10)
Dark Eldar
- Reaver jetbikes (1/3)
Tau
- XV-8 Crisis Suit w/ drones
Not bad, eh? This is just what is finished, there has been some other WIP as well.
Tuesday, August 21, 2012
Eldrad Ulthran
Finished painting Eldrad Ulthran. Really fun model with many small gems and details. Some parts of the model was painted several times in different colors before I could decide on a scheme I liked.
I should probably add some runes (transfers or freehand) to the cloak, sometime...
Overall, I'm very pleased with how he turned out!
I should probably add some runes (transfers or freehand) to the cloak, sometime...
Overall, I'm very pleased with how he turned out!
 |
| Eldrad Ulthran, front |
 |
| Eldrad Ulthran, back |
Friday, August 3, 2012
State of affairs
So this post is something of a status update and a to-do list for my painting. Maybe not as interesting for you guys out there as it is for me; sorry for being egoistic here. But I think it will be interesting to look back at this post and see how things actually turned out.
Dark Eldar take a bit more time to do since I hold my self to a higher standard for my second painted army, and also I decided to base each model when painting and not wait with that until later, since later never comes...
Edit: when writing this list I am quite pleased with the progress, and I actually feel more motivated to attack the "ongoing" projects! Great stuff.
Ultramarines
Not started
- 2 x Land speeder
- 2 x Predator
- Scouts squad (5)
- Lasplas Razorback turret
- Dreadnought
Ongoing
- Tactical squad (10)
- Assault marines squad (5)
- OOP Librarian
Finished
- Stormtalon Gunship
- Razorback
- Rhino
- Tactical squad (10)
- Scouts with sniper rifles (5)
- Captain
- Chaplain with jump pack
- Dreadnought
- Scout Sgt. Telion
- Devastator squad (6)
- Terminators (6)
Dark Eldar
Not started
- Wyches (10)
- Warriors (10)
- Haemonculus 2
- Wracks (5)
Ongoing
- Lelith Hesperax
- Raider
- Ravager
- Venom
- OOP Wyches (5/10 painted)
- Reaver jetbikes (3)
Finished
- Razorwing Jetfighter
- Haemonculus 1
Tau
Not started
- XV-8 Crisis Suit
Stormtalon!
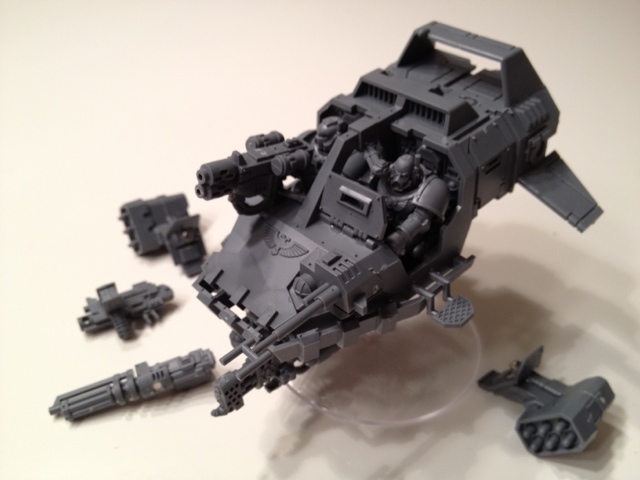
I should write a longer post on the current status of my army(-ies), but I'm le tired... so here's a Stormtalon I just finished. :)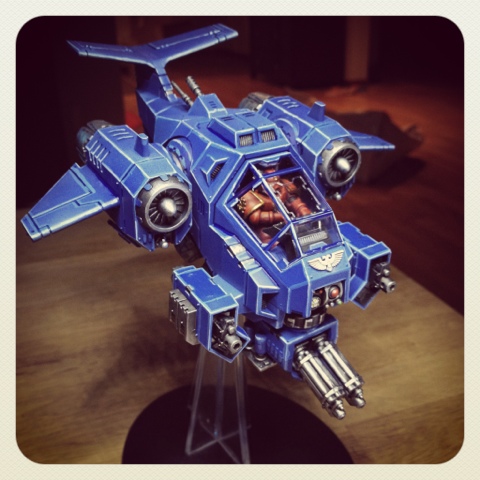
Tuesday, July 17, 2012
Finished models
Painting of my Eldar army is progressing, although slowly ;)
So far I have finished (including bases!) one Striking Scorpion, one Howling Banshee (OOP) and one Wave Serpent. From now on I will try to prioritize my painting the models in my updated army list for 6th edition. First out will be a bunch of Jet Bikes and Fire Prisms, but as they are in their boxes right now, it will probably take some time before they are finished.
 |
| Striking Scorpion with Scorpion Chainsword and Shuriken Pistol |
 |
| Howling Banshee (OOP) with Power Sword and Shuriken Pistol |
 |
| Wave Serpent in Biel-Tan Craftworld colors |
Thursday, June 14, 2012
Building a portable gaming board, part 4
This is part four, here is part three.
Prior to a small friendly tournament in the beginning of June, I finished my gaming board.
I applied a couple of layers of earth/mud brown color with a sponge and large flat brush (using dry brushing strokes, but with quite a lot of paint in the brush)
I'm quite satisfied with the result, although some lessons were learnt:
Prior to a small friendly tournament in the beginning of June, I finished my gaming board.
I applied a couple of layers of earth/mud brown color with a sponge and large flat brush (using dry brushing strokes, but with quite a lot of paint in the brush)
 |
| Tools! |
 |
| Work in progress |
 |
| After three layers of increasingly brighter brown |
 |
| Table ready for tournament! |
- Don't glue the MDF boards and styrofoam together until you are finished with painting
- Work with the whole gaming board all the time, don't do one MDF board at a time, the texture on the three boards will turn out very differently if you do.
- Apply paint in random patterns/circles. Don't work from one edge to another (if you mix new paint at some point, you will have a noticeable change in color on the board)
- Don't use wet sand
- Don't mix glue and sand. Apply glue and then sand.
- You might not want that last layer of highlight color all over the board... :)
Friday, June 8, 2012
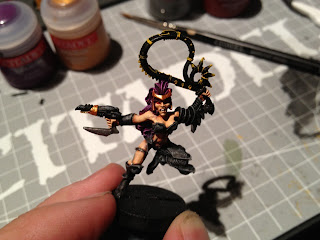
My wife the wych
So the day came when my wife decided to start an army. Turns out she fancies Dark Eldar! This is my first painted model to start her off, a Wych. Let's hope there will be many more. I am already looking forward to family game nights, and getting my Ultrasmurf ass handed to me by these scantily clad ladies. :)

Friday, June 1, 2012
How to magnetize a land speeder
Hello fellow hobbyists!
It was quite hard to find a detailed description of how to magnetize a land speeder. It is actually a tricky kit to assemble with magnets. So here is my contribution to the Internets. Hold on to your neckbeards, this will be a lot of steps and pictures.
Firstly, assemble the two main pieces. Don't glue on the sides yet, we will need those loose to start with.
 Then cut out the doors and clip off the little pins that would be hinges if we didn't magnetize this sucker.
 Now look at the side profile of these two right doors. One is for the missile launcher, and one is flat. But the inside looks quite different in thickness. We will need to fix this if we want interchangeable doors with magnets.
 Finish the missile launchers and fix them to the doors.

 Next, cut off a piece of sprue to use as a filler on the flat doors. We are aiming to replicate the one on the ML doors.
 Use a scalpel to grate off plastic until you get the correct thickness. It is not as hard as it sounds, the plastic comes off in thin slivers.
 Glue the filler piece to the flat doors like so! Notice that we now have two flat surfaces with identical thickness to mount our magnets on.
 Put a drop of super glue on the flat door and put two magnets on that drop. Then fasten the side wall of the land speeder to the floor. Don't use any glue on the wall yet! This is just for measuring. Now put the door with the magnets in the opening and look inside. Try to remember how far in the magnets reach; this is where you will put a mounting beam for the inner magnet.

 Put the beam in a bit too tight for the magnets to fit and then push the door with the two magnets against it. This will ensure that the beam is placed at the correct depth, since the plastic glue is still sticky and the beam will move inwards.
 Now put a drop of super glue on the inner magnet and put it in place in the door opening, firmly against the beam. Note that we still have not glued the land speeder side wall to the rest of the speeder. This is how we want it until the beam and magnets have set correctly. If we had to make corrections to this setup that would be very hard with the side wall glued in place.
 I use rubber bands to keep the door in place until the glue have set. Hopefully I can pull the door apart and have one magnet inside the ship and one on the door after about 15-20 minutes.

 Now put a new magnet on the inner magnet and put a drop of super glue on it. The missile launcher doors should fit just right, but if the thin beam protruding through the door is in the way, just clip it off. Mine slides right in because I am awesome.
 Then fasten the ML door with a rubber band and go for a walk with the dog. That's what I will be doing. See you in a bit!
 Rinse and repeat for the other side.
 While you are waiting for the last door to set, go ahead and cut out and assemble the nose guns and bracket.
 I drilled a 2 mm hole at an angle into the gun bracket, making sure that I preserve the little holes made for the pins on the guns. That way, we get both magnet and the little pins holding the gun in place. Drill as deep as you need or straight through, there is nothing you can mess up on the back side of the bracket.
 Then drill corresponding holes in the guns. The holes are quite easy to line up because of the little pins. I chose a 90 degree angle between magnet and pins, and measured it out by eye. Putting a dot of paint on one magnet and then dry fitting is another way of lining up the holes.
 Now go ahead and assemble everyting else on the speeder except the little dudes and their guns and arms. Looks really nice I think! Don't worry, there is not much left and the rest is a bit easier.
 Now for the final part; the passenger gun. The only delicate step here is fixing a magnet to the arms holding the gun. What I did was use the drill to remove about half of the plastic strut between the hands, forming a semicircular gap, in which a 2 mm magnet can fit and get a good surface to glue it to. On the guns, there is a perfect spot to drill and put the other magnet as you see in the picture below.
 Lastly, glue the arms to the torso and make sure the shoulders sit where you want them to. Then put a gun on the rail and use that magnet to keep the arms in the correct position while the glue sets. This will ensure that both guns get a good position.
 And that is it! Now it is just a matter of finishing up all the details and get painting.
I hope you enjoyed this tutorial, or at least learnt something of value from it. Have fun out there, and remember, don't eat the magnets.
It was quite hard to find a detailed description of how to magnetize a land speeder. It is actually a tricky kit to assemble with magnets. So here is my contribution to the Internets. Hold on to your neckbeards, this will be a lot of steps and pictures.
Firstly, assemble the two main pieces. Don't glue on the sides yet, we will need those loose to start with.


These are the magnets I'll be using. 3 mm for the doors and 2 mm for the guns. I would have preferred larger, flatter magnets for the doors, but hey, this is what I had at home. :)


Cut out another piece of sprue and use the scalpel to get a near perfect fit between the inner walls. Dry fit until it feels good. Use plenty of thin plastic glue on the sides - this will even out the plastic and make the beam "float around" on the inner walls for a while, which gives us time to get a perfect fit.


Et voilà! The magnet came off without a hitch. Good work, me.


I hope you enjoyed this tutorial, or at least learnt something of value from it. Have fun out there, and remember, don't eat the magnets.
Tuesday, May 22, 2012
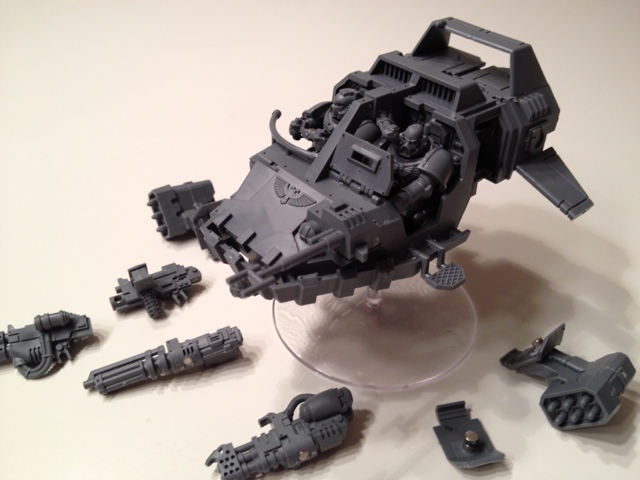
Land speeder magnet extravaganza
First one done, now I know enough to post a tutorial based on the second one (without the rookie mistakes). This is just an overview of the loadouts. Details on clever spots to put magnets coming up later. All in all a fun but very challenging kit. Gunz blazin'! :)

Monday, May 21, 2012
Building a portable gaming board, part 3
This is part three, here is part two.
I was not entirely happy with the resulting texture of my sand+glue mix, so I started to experiment a bit with plaster, glue and dry sand. In short I added some spots of filler to make the board a bit more even, and also to create a greater variation in the texture of the surface. I then applied watered down PVA glue over the board and added dry sand to improve the texture.
Satisfied with the texture I moved on to painting the boards. Starting with a base coat of black acrylic paint.
As the watered down black paint didn't cover exactly as well as I have hoped for, I might add a second layer of black before moving on to dry brushing.
I was not entirely happy with the resulting texture of my sand+glue mix, so I started to experiment a bit with plaster, glue and dry sand. In short I added some spots of filler to make the board a bit more even, and also to create a greater variation in the texture of the surface. I then applied watered down PVA glue over the board and added dry sand to improve the texture.
 |
| PVA glue/water mix + dry sand = love? |
 |
| Three boards require lots of paint... |
 |
| All three boards base colored. |
 |
| Texture close-up |
Thursday, May 10, 2012
Building a portable gaming board, part 2
This is part two, here is part one.
After some texture experiments I decided to apply a mix of sand and glue to my portable gaming board.
1 part PVA glue and 5 parts (wet) sand were mixed and applied to the surface of each gaming board. If the sand would have been dry, adding water would have been necessary.
I used approximately 7-8 dl glue for all three boards.
I used a large brush to apply the mix onto the surface, and a roller to even the mixture on the board.
 |
| Yummy! |
 |
| One board done. |
Caution! Brushes and rollers involved in this process will not be usable for painting afterwards.
Monday, May 7, 2012
Building a portable gaming board, part 1
Tonight I started building a portable gaming board, inspired by painter dad's approach. Instead of a gaming mat I'm using 4mm mdf to make it slightly more sturdy.
The styrofoam boards (3x 120x60cm) will be will be slightly smaller than the mdf boards, so I let the friendly guys at the lumberyard saw three pieces of mdf (1x 122x60cm and 2x 122x61,5cm). The 122x60 will be the center board, with no mdf outside the styrofoam on the longsides.
The styrofoam boards (3x 120x60cm) will be will be slightly smaller than the mdf boards, so I let the friendly guys at the lumberyard saw three pieces of mdf (1x 122x60cm and 2x 122x61,5cm). The 122x60 will be the center board, with no mdf outside the styrofoam on the longsides.
 |
| Applying glue |
 |
| Gluing the styrofoam board to the mdf board |
 |
| All three boards glued, applying some pressure ;) |
At this point I haven't decided on a ground texture. Xenos world or jungle theme?
Subscribe to:
Posts (Atom)