Therefore, I needed a modular and lightweight gaming table with a nice texture that I could easily take out and then stow away to keep the missus happy. Cheap is also good when you're a dad, so price was definitely a factor.
Enter the StyroTable! I purchased a Citadel Battlemat, three styrofoam insulation boards that just happen to be 1200x600 mm (~4'x2') and a bottle of white glue. As I am typing this the project is drying over night, so this will be a two part tutorial.
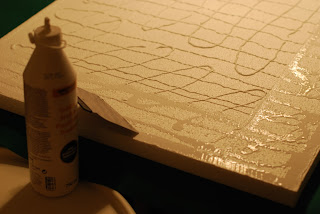
First, cover your work surface in case you are the clumsy type (I am). Then lay out one of the boards.
Yes, the picture shows two boards. Stop being such a besserwisser. Now, grab your white glue and glue the living daylight out of that sucker. No, seriously - don't use too much glue. But pay attention to the edges. I used a spackle spatula to spread it out a bit more evenly. Don't worry, it's easy to fix dry patches around the edges with a bit of glue on your finger when it has dried the day after.Measure up and cut the battlemat in three pieces of the same size. Folding the cloth over itself and then cutting along the edge helps keeping it straight, but you will have to trim excess cloth afterwards anyway. I used a friend, a wife and household scissors to achieve cosmic straightness.
Put the cloth down over the glue from the middle and out to avoid getting glue on the grassy side. Then stretch along the edges and use your palm to iron out any creases. Break out all your heavy books or other suitable weights to keep the whole thing secure during the night.
Looks promising, eh? Stay tuned for part 2!
xoxo,
Gossip Dad


No comments:
Post a Comment